Showing posts with label DIY. Show all posts

Friday, January 30, 2015

DIY Arrow Quiver Valentine Holder

These quiver Valentine holders are a breeze to make and so much fun for kids!

You will need a large (42 oz) oatmeal canister, fabric, ribbon or trim to complete this project. See below for simplified, non-sew versions!
Cut main fabric to 16.5" x 7"
Cut accent/border fabric to 16.5" x 4"
*optional: embroider name on border fabric, paint and stencil, or personalize with chipboard at end

Sew right sides together, making sure name will be the right side up when flipped up.
Iron your seem and fabric so it lays flat.

Cut ribbon to desired length for quiver strap so it will fit over shoulder and neck like a hand bag. I did mine at 30" for toddlers. Pin to one end of fabric as shown.

Fold fabric over so the ends align and sew to make a tube, being careful to not sew anything other than ends of ribbon. 

Turn right side out. You are ready to slide the tube you sewed over your oatmeal canister!
Decorate with ric-rac or ribbon as desired!

Wear, use as a fun Valentine holder!


The kids LOVED their personalized quivers to hold their arrows they decorated as well as Valentines!


Simplified versions: (for non sewers and kids)
-Use wrapping paper!
Let kids get creative and paint, glue paper, use stickers, ribbons to decorate and personalize their own.
You can make 2 out of one fat quarter if you aren't sewing. Just glue fabric to container, and use ribbon to cover the edge.

Be sure to check out our Qupids Arrow Valentine party to see more of how we used our quivers!


Cupids Arrow Free Valentine Party Printables

Love Struck Banner
Simply print (this was printed at a bit smaller scale to fit the width of my treat table at 75%), cut out, and attach to banner. This step can be done by pinning to jute or ribbon like I did here to my arrow yarn garland, or punching holes on the top at each side and then threading through desired ribbon or cording.


Geometric Hearts and Cupid treat topper printables
Cut or punch out using a 2" circle punch, tape or glue back to bakers stick or paper straws cut down to size and place in dessert!

It's kind of fun getting unique items to break up all the treats that are given at Valentines. Teachers and parents appreciate it too! I created for you these Glow stick arrows and Pencil through the heart Arrow Valentine Free Printables to simplify putting together cute Valentines!

Print, cut out, and using a craft knife or sharp knife, cut slits on each end of arrow and heart so glow sticks or pencils can be placed in. I found my glow sticks bracelets at Dollar Tree in packs of 5-8 and the pencils and pencil as well as pencil topper stamps in packs at Target Dollar Spot.


Glow Stick Valentine Printable

Valentine, you've got the "write" stuff

Pencil Valentine Printable
To add names, you can insert the file into Microsoft Word, create a text box and write name of person handing out Valentines or have them sign their name with a marker.


Thursday, January 29, 2015

Twins "Two Little Monkeys" Birthday Party

Since our two year old twins are always full of mischief, it seemed fitting that we throw them a "Two" Little Monkeys party for their 2nd birthday!

For the decor, I stuck with primarily yellow and red, while incorporating touches of bright colors to tie in the fun sock monkeys used as decor. Simple burlap bunting was hung from trees in a park, along with inexpensive lanterns found at a party store. For the centerpieces, I did a simple floral arrangement which also included some white spray painted branches to create a modern "tree" for the sock monkeys to swing in.

Sweets table


"Hummus shooters" are a simple appetizer that look a little dressed up in these individual glasses. Simply add your favorite hummus, and serve with assorted veggies and pretzel rods.

Simple cupcakes made from a mix are dressed up in cute wrappers and topped with gumballs in coordinating pops of color. Macarons made by Seine Macarons in fun bright colors were also a popular hit with the guests.  


Freshly popped popcorn was also placed in individual paper sacks along side assorted candies.

Water for thirsty monkeys

Favor boxes for littles to take home included assorted candies, along with a sock money that doubled as decor! They were stuffed in simple takout boxes with some shredded crinkle paper and wrapped with labels that said "thanks for swinging by" and "thanks for Hanging with us"


The party was a hit with the our little monkeys!


Wednesday, September 26, 2012

Twin Cookies and Milk First Birthday Party

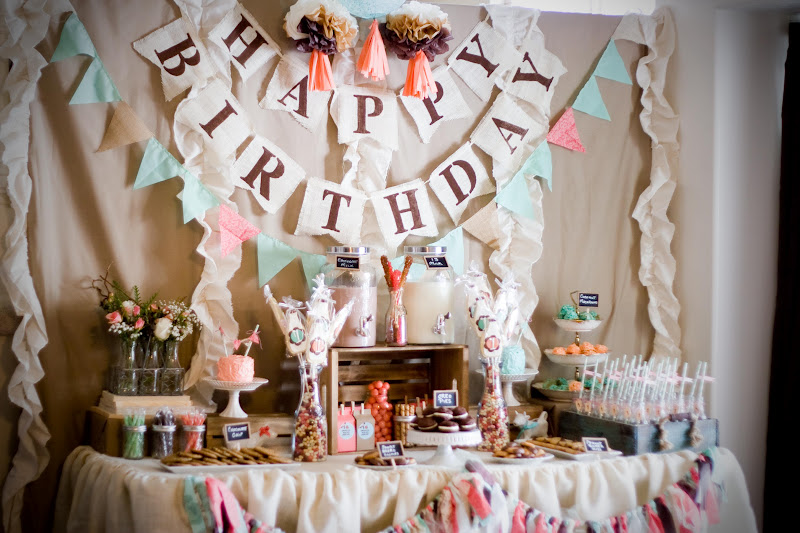
Having boy/girl twins, I wanted to create a party that had touches of masculine and feminine to represent them both but wasn't too strong in either way.  This can be very tricky to do!  I did this by adding small doses of ruffles, lace, fresh florals and coral and balanced them with burlap, neutral tones, and distressed crates.  The feel of the party is a vintage and rustic chic spin on a Cookies and Milk Party.  Read on for pictures and details.
I sent out postcard invitations to the guests...
with custom stamps featuring the cuties of course.
Most of the details of the party were done DIY.  For my back drop I used a queen size sheet which we then sewed muslin ruffles to. I used a stencil, paint, and burlap to create the Happy Birthday banner and also incorporated some coral and aqua bunting to the back drop.  A rag banner adorned the front of the burlap table cloth.  I made many ombre tissue poms with tassles for the party and included a few at the dessert table.  I used crates and old books to add height and texture to the display. 
I created printable coral chevron and chocolate stripe flags for my retro striped straws. My milk bottles were actually the Target brand frappuccino. I stamped the number "1" on little wood tags that I attached to my milk bottles with bakers twine. An old crate with rope was the perfect serving tray.
Homemade Coconut Macaroons from Cakes by Deanna and Milk Bottle Sugar Cookies from My Cookie Couture.
Homemade oreos using this recipe. They disappeared FAST!
I bought mini chalk board ornaments from Joann's and used as signage for the cookies.
Soft fresh florals in milk bottles with lace and coral bunting on smash cake for the Little Miss.
Burlap and aqua with bakers twine bunting on smash cake for the Little Man.
Milk Bottles filled with Jelly Bellies served as vases for the sugar cookie pops. 
"So Sweet of You to Join Us" milk carton favor boxes for guests to fill with cookies and candy.

Milk displayed on crate.
 Cookie Decorating Station
Soft and casual florals were displayed in milk bottles and mason jars.  Burlap and lace runners lined the tables.
Pictures of the twins were displayed in mason jars filled with taffy. 

Colorful bunting and tissue poms set the tone for the party in our back yard.  On the outdoor food table I included a vintage crate with burlap and a sign "Place empties here for milk man" for a home for the used bottles.
I also displayed pictures of my sweet twins on a vintage wash board.
A bouquet of taffy skewers was displayed in an old creamer can.
I made vases out of paint sticks glued to formula cans and then painted... So inexpensive! An old barrel becomes a table to hold my beverage container with coral and aqua water bottles.

And because I simply can't resist...


Two happy one year olds equals a very successful birthday party!

This party was featured on Studio 5 Blogspotter and Kara's Party Ideas!